In most cases WordPress will tell you exactly what went wrong when you run into a problem. However, “Are you sure you want to do this? Please try again” error. The message itself does not give you any helpful information to fix the problem.
Fortunately, the WordPress community is very active and we know exactly what the (many) causes of this error are. In this article, we will talk about six ways to deal with this problem:
- Disabling your plugins and reverting to your default theme.
- Increasing your PHP memory limit.
- Resetting your WordPress security keys.
- Checking your WordPress uploads for unsupported file formats.
- Clearing your WordPress cache.
- Upgrade to a better hosting provider.
As you can see, we have a lot to talk about. However, don’t be intimidated as these fixes are mostly pretty straightforward. Let’s go inside now!
What Causes the “Are You Sure You Want to Do This? Please Try Again” Error

When it comes to troubleshooting, your first move should always be to read the error messages you get. In most cases this will tell you everything you need to know to fix the problem you are facing. However, some bugs don’t help much.
Are you sure you want to do this? Please try again error is one of the biggest culprits when it comes to providing insufficient information. It can occur when you try to do almost anything in WordPress. However, some of the most common times you will encounter are:
– When you try to install a plugin or theme.
-During a media file upload.
-When trying to publish a new post or page.
-When customizing a theme, post or page.
-If WordPress encounters a PHP-related error or your website encounters a security issue.
It’s a long list and there isn’t any common denominator between all these situations. In other words, “Are you sure you want to do this? Please try again” error is WordPress’ way of saying: “Something went wrong and we’re not sure what. Let’s try again and see if it works this time!”.
In some cases, trying to perform the same action again will not trigger the error a second time. However, in our experience, you often need to resolve the underlying problem before you can finish what you’re doing. With that in mind, let’s look at how to fix this error.
Are you sure you want to do this?” Ways to Fix Your Problem Please Try Again” Error
You need to be methodical when it comes to troubleshooting as there are so many possible causes for this error. In this section, we’ll show you six ways to fix the problem, from the most likely solution to the most likely solution.
If you’re lucky, you won’t have to try all these fixes. However, don’t be discouraged if the first thing you try doesn’t fix the problem, keep going!
Disable Your Plugins and Revert to Your Default Theme
Most WordPress websites use several plugins at once. In some cases, one or more of these plugins may cause compatibility issues with each other or with your theme. The best way to find an add-on is to disable them one by one until you find the culprit behind your troubles or rule them all out.
This process is simple if you have access to your control panel. Go to the Plugins tab and disable each of your plugins in turn, starting from the beginning:
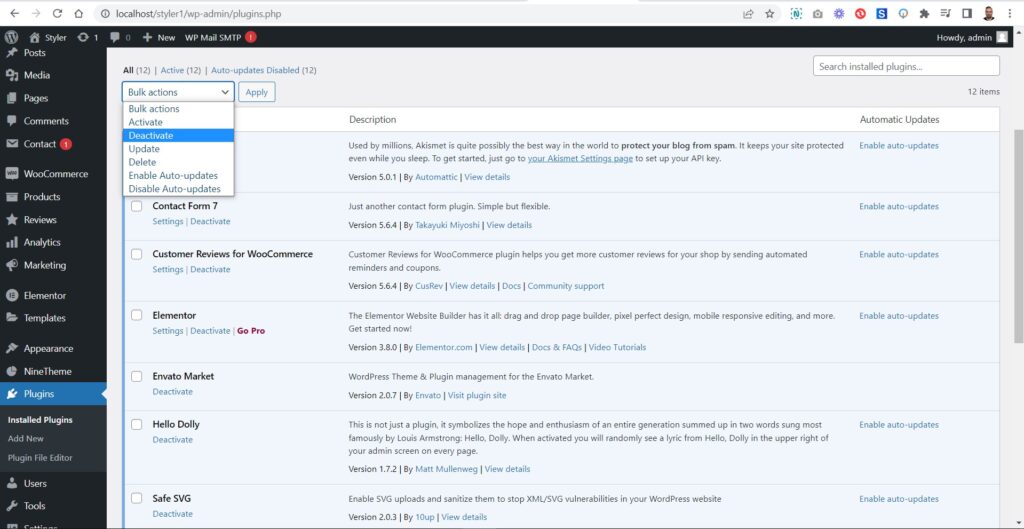
After closing each one, ask “Are you sure you want to do this? Please try again” error persists (by repeating the action that triggered it in the first place).
If you are inconclusive on all plugins, go ahead and switch to your Themes tab. Change your active theme and double check to see if the error persists.
Once you rule out plugins and themes as the source of your problem, you’ll want to re-enable them all. Then, move on to the next fix.
But if you don’t have access to your control panel you need to take another approach. To disable your plugins and theme, you need to access your website via FTP using a client like FileZilla.
After connecting to your website via FTP, go to the public_html/wp-content directory. Inside you will see several folders, two of which are called plugins and themes. In these directories you will find unique folders for each of your themes and plugins. Right click on the plugins folder and rename it plugins.deactived.
This simple action will disable all your plugins at once. Then access your website again and try to reproduce the error. If it’s gone, just rename your plugin directory to plugins. Then you can open it and change the name of each plugin folder to pluginname.deactived. As before, your goal is to turn off each plugin in turn until you narrow down the culprit:

If none of your plugins are faulty, remember to revert their folders to their original names. Otherwise, WordPress won’t recognize them. Next, you will need to repeat the process with your active theme. Go to public_html/wp-content/themes and find the folder corresponding to the theme you are using. Change its name so WordPress doesn’t recognize it:
Try copying the error one more time to see if this change fixed it.
If it turns out that the source of your problem is a plugin or theme, you have a few options. If possible, you can try to update it, remove it, or look for an alternative that doesn’t trigger errors on your website. However, if none of them appear to be faulty, move on to the next solution.
Increase Your PHP Memory Limit
WordPress runs in the PHP programming language. When your website tries to run plugins and scripts, it has a certain amount of PHP memory it can use. If these scripts run out of memory, “Are you sure you want to do this? Please try again” or “The allowed memory size of XXXX bytes has been exhausted”.
These days, most WordPress web hosts set the appropriate memory limits for your website right out of the box, so this error is not that common. That said, setting your PHP memory limit is pretty straightforward, so if yours is too low, it doesn’t hurt to try.
There are three ways to increase your PHP memory limit in WordPress. The first involves making a change to your server’s configuration, which you cannot do if you are using certain types of hosting. With that in mind, we’ll go straight to the other two methods that involve editing your .htaccess or wp-config.php files.
Both of these are WordPress core files, which means they are extremely important and contain settings that make your entire website work. Therefore, you need to be extra careful when editing any of these.
First, you need to use FTP to access your site’s files directly. Once inside, search for the .htaccess file located in the public_html directory:

Right-click the file and select View/Edit. This opens .htaccess using your default native text editor and allows you to make changes to it. Now navigate to the bottom of the file without making any changes to the rest of its code. At the bottom, paste the following snippet:
php_value upload_max_filesize 256M
php_value post_max_size 256M
php_value bellek_limiti 256M
php_value max_execution_time 180
php_value max_input_time 180
This will set your maximum PHP memory size to 256MB; this is more than enough to handle any script. You will also increase your file size upload limit and give your website more time to upload files and process scripts.
After adding the code, save your changes to .htaccess and then close the file. FileZilla will ask if you want to save the changes to your server, so go ahead and say yes.
Then, “Are you sure you want to do this? Please try again” error once again. If it’s gone, then you’re in luck. But if it persists, there is another file you can try to edit to increase your PHP memory. It’s called wp-config.php and is located in the same directory as .htaccess:

Find it now, then open it using your text editor and look for the line that says Happy blogging! at the end of the file. Paste this code just above it:
define ( 'WP_MEMORY_LIMIT' , '256M' ) ) ;
This will increase your PHP memory limit to 256MB. Although you’ve already tried to do this via .htaccess, sometimes (due to the way your server is set up) only one of these approaches will work. If the error persists after saving the changes to the wp-config.php file, it’s time to move on to the next method.
Reset Your WordPress Security Keys
Your WordPress security keys are also known as ‘salts’. These are cryptographic sequences that the platform uses to protect the information it stores in your database. This may sound complicated, but you don’t need to understand all the technology involved. Changing your keys only means “Are you sure you want to do this? Please try again” error.
WordPress stores your site’s unique salt keys in the wp-config.php file. As we mentioned earlier, you can find this file in the public_html directory. Connect to your website via FTP and navigate to the folder, then open wp-config.php in your text editor.
Then use the search feature of your text editor to find the line that says “Authentication Unique Keys and Salts”. Just below that you will see a set of eight lines of code and you will need to replace them all:

To do this, visit this link from WordPress API, which will generate a new full set of keys. Delete the existing lines, replace with the set you just created, then save and close the wp-config.php file. After that, try to access your website again.
WordPress will prompt you to log in due to the change in your keys. Once you access your control panel, check if the error persists. If there is, you need to scroll down the list.
Check Your Uploads for Incorrect File Formats
WordPress allows you to add a wide variety of files to use in your posts and pages.
Are you sure you want to do this? Please try again error occurs when you try to upload a file type that WordPress does not support. If you encounter this problem, you can convert the file you want to upload into a format that the platform can handle. Otherwise, you will keep encountering the same error over and over while trying to upload the file.
So, try saving the file in another format supported by WordPress and adding it to your site. If you encounter failure (or the action you’re trying to perform is something other than uploading files), you’ll need to try something else.
Clear Your WordPress Cache
If you are using a caching plugin with WordPress, you may encounter errors when trying to make changes to your website. This issue is actually pretty easy to fix as all you have to do is clear your WordPress cache. The problem is that the action required may vary depending on the plugin you are using.
As an example, let’s look at the WP Super Cache plugin. It is one of the most popular WordPress caching plugins and very easy to use and configure. To empty your cache via this plugin you need to go to Settings › WP Super Cache tab in your control panel. Once there, look for a section called Delete Cached Pages:
There’s a big button just below it that says Wipe Cache, so you won’t miss it. Just click this button and the plugin will empty your cache.
We hope this article helped you fix the Are You Sure You Want to Do This? in WordPress. You may also want to see our list of the most common WordPress errors and how to fix them.
If you liked this article, please subscribe to our YouTube Channel for WordPress video tutorials. You can also find us on Dribbble and Behance.

If you have any questions about this article or other topics, please click the button below. Your questions will be answered soon.
If you want an affordable, reliable and fast WordPress server, just go ahead and click on the button and get a package as needed.
Related Posts

How to Install WordPress Theme Manually with XML?
Oct 12, 2023How to Fix Error Too Many Redirects in WordPress
Jun 23, 2023


Envato elements

Canva


Envato Market

Envato Placeit
Blog Categories
- Agriculture 1
- Design 3
- eCommerce 13
- Energy 1
- Extras 75
- Free 4
- Grocery Store 3
- Software 1
- Technology 3
- Themes 78
- WordPress 145
- Plugins 58
- Cache 5
- Security 8
- SEO 10
- Spam 5
- User Managament 10
- WooCommerce 6
- Plugins 58
- WordPress Speed 2
- WordPress Tutorials 55