First of all, thank you for choosing our theme. This documentation is meant to created to help you get started creating your site with our theme. In case you run into any kind of issue that you could find on the documentation, please feel free to get in touch with our dedicated support team on our support desk.

First Steps

To install this theme you must have a working version of WordPress already installed. If you need help installing WordPress, follow the instructions in WordPress Codex. Below are some useful links for WordPress information.

Choosing a hosting provider is a matter of choice based on their location, pricing and services. This is an important decision at the start and we strongly suggest you choose a WordPress friendly hosting provider for using our themes.

Latest technologies are always the best so stick to hosting companies that provide flexibility in your online presence.Often asked by our clients, we try to determine most appropriate hosting providers for them but it is always your choice based on your goals, so here is the list of hosting companies we recommend (referral link):

For Beginners - WordPress installation Steps - Video Courses

If you don’t have enough experience to install WordPress on a server, we have compiled some videos for you. However, if your server and WordPress installation are already installed and ready to be used, then you can skip those videos.

Download Theme files from ThemeForest by going to the Downloads tab and finding the Purchased Theme. Click on the Download button. The “All files & Documentation” archive contains everything and the Installable WordPress file only is just the installable WordPress theme file

The contents of the theme package downloaded from ThemeForest:

  • Licensing –  this folder contains the terms and conditions of the license under which Ohio is distributed and some information on licensing of various parts of the theme in a separate file
  • Plugins – this folder contains plugins required to work with our theme in case you cannot install them with the prompt or just need a local copy of
  • Theme.zip – this is the archive you need to upload to WordPress.
  • Demodata – this folder contains the xml file of the demo data of this theme

Requirements and Compatibility

You need to make sure that your web host has the minimum WordPress requirements to run our themes-based sites:

Important: If you do not have an SSL certificate, you cannot receive and upload demo data from our server.

  • PHP version 7.2 and above
  • MySQL version 5.6 and above
  • The mod_rewrite Apache module
  • The iconv extension with UTF-8 encoding
  • HTTPS support
  • max_execution_time more than 180, we recommend 300
  • memory_limit at least 256M to run all plugins without issues

Plugins Compatibility

Our theme is compatible with almost all plugins.

  • Elementor Page Builder
  • Slider Revolution
  • WooCommerce
  • WPML
  • Gravity Forms
  • Contact Form 7
  • ACF Advanced Custom Fields
  • Custom Post Type UI
  • The Events Calendar
  • All-in-One WP Migration
  • Autoptimize
  • Yoast SEO
  • WP Super Cache
  • Metabox

Theme Installation

After you purchase the elementor theme on ThemeForest, you can download the theme. : You should keep in mind that can download 2 archives from ThemeForest:

  • First is a product archive with documentation links and some additional files like changelog, lisense etc.
  • Second is the archive theme-name.zip with the theme itself — this file you need to install

Installation via WordPress

Step 1: Navigate to Appearance > Themes.

Step 2: Click Add New and then press the Upload Theme button.

Step 3: Find the archive theme.zip on your computer and click Install Now button.

Step 4: After the installation, the theme must appear at Appearance > Themes page, where you can activate it

Installation via FTP

Step 1: Connect to your hosting via FTP software

Step 2: Unzip the archive theme.zip on your computer

Step 3: Upload the extracted theme folder into wp-content/themes in your WordPress installation

Important Note: If you cannot install the theme correctly with the Installation Wizard, please click the button and follow the steps one by one.

Import Demo Content

Play Video

Updating the Theme

There are two methods to update your theme: the easiest way is the  Envato Market Plugin which requires you to register your purchase and the second way is to update / install the theme through your server, where the theme files are being stored.

Watch the following video for Envato Market Plugin method.

Play Video

Watch the following video for Manual Update method. ( FTP )

Play Video

Main Settings Tab

  • Theme Color: You can control the general color of your website.
  • Breadcrumb: You can enable / disable the breadcrumb of your single pages, such as single blog pages, single product page, single portfolio pages etc.
  • Preloader: There are 12 types and a custom gif preloader options and you can use any of them depending on your website design.
  • Typography General:  This option makes you able to controll all of your titles ( h1,h2..h6 ) and paragraphes ( p ) in your websites.
  • Back To Top: It gives you some options such as on /off, background color and the offset to control it.
  • Pagination: Pagination allows your user to page back and forth through multiple pages of content.

Blog Page Tab

  • Header Menu : You can enable / disable the sticky menu, enable / disable the sticky menu transition. You can set the typography for your menu items
  • Header Language: You can enable or disable the site header language or you can remove any unnecessary language easly.
  • Header Right Button: One button come out as default bu you can add a second header right button if needed. Or you can leave those fields empty and none of them will appear on the frontend.
  • Header Template:  There are two types of header in this template, which are Default Site Header and  Elementor Templates. If you select the Default Site Header, you’ll get the default header that you see on the live demo. However, if you select the Elementor Templates type, you can create your own header and then display instead of the default site header.

Single Blog Page Tab

  • Single Hero: On this tab, you can have the control over your single blog page hero area. You can select single blog page’s hero text alignment, changing the single page’s hero title, subtitle and description and also can add a background image for the single blog page hero area. You can also use a background color instead of adding a background image as you wish.
  • Single Hero Parallax: Allows you to change the parallax effect type of your single blog hero.
  • Single Content: Here, you can also hide the Single Post Authorbox, Single Post Pagination Display, Single Post Tags Display etc on your post items.

Archive Tab

  • Archive Hero: On this tab, you can have the control over your archive page hero area. You can select  archive page’s hero text alignment, changing the archive page’s hero Slogan and description and also can add a background image for the archive page hero area. You can also use a background color instead of adding a background image as you wish.
  • Archive Hero Parallax: Allows you to change the parallax effect type of your archive page hero area.

404 Page Tab

  • 404 Hero:  There are six different 404 page types in this theme. These are Default, Cover 1, Cover 2, Split, Video BG and Custom type from page. You can select any of them as you wish.
  • Default 404 Hero: On this tab, you can have the control over your default 404 page hero area. You can select  adefault 404 page s hero content alignment, changing the default 404 page’s hero Title, Slogan and description and also can add a background image for the default 404 page  hero area. You can also use a background color instead of adding a background image as you wish.
  • Default 404 Hero ParallaxAllows you to change the parallax effect type of your default 404 hero area.
  • 404 Content: Here, you can add your own contents in the 404 hero area. Lets say, you can easly change the tite, add a slogan or a description.

How to Create a Shop Page

Once you activate WooCommerce plugin for the first time, you are invited to set up your shop using the WooCommerce setup wizard. It is pretty intuitive and allows you to get your shop running in no time. Nothing can describe getting started with WooCommerce better than its original documentation. Here are links to help you get started:

wordrpess-elementor

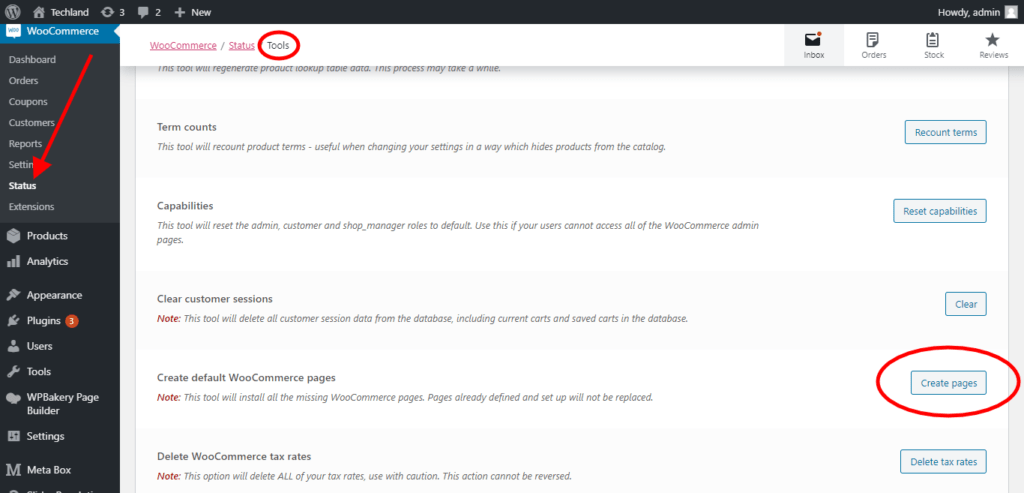
However, if you want to get started manually, or skipped the setup wizard, then you need to get a set of shop pages, here is what you need to do:

  • From the dashboard go to WooCommerce → Status → Tools;
  • Find the Create default WooCommerce pages option;
  • Hint the Create pages button on the right.
Elementor Themes Documentation

How To Setup Contact Form 7?

If you like to receive the messages from your visitors via the contact form on your site, you should make sure that you’ve set your form settings properly.  This way, when someone send you a message via your contact form, their message will be dropped into your email address.

Adding reCAPTCHA to Contact Form 7

reCAPTCHA protects you against spam and other types of automated abuse. With Contact Form 7’s reCAPTCHA integration module, you can block abusive form submissions by spam bots.

The latest version of the reCAPTCHA API is v3. Contact Form 7 5.1 and later uses this reCAPTCHA v3 API. reCAPTCHA v3 works in the background so users don’t need to read blurred text in an image or even tick the “I’m not a robot” checkbox.  Please click on this link to see how to add 

How to display your portfolio items on a page

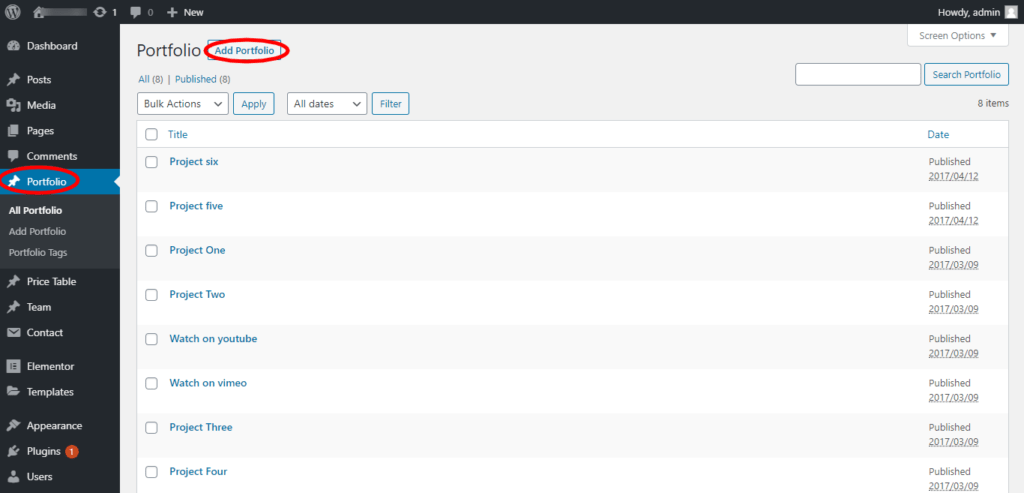
Thanks to the Custom Post Type UI  (CPT )plugin that is compatible with this theme, building a portfolio page is so simple than ever. Once you import the demo data sucessfuly, you’ll already get the demo portfolio items on your WordPress panel, which you can see through Dashboard > Portfolio. that is, where you can see the demo portfolio items. You can either remove them or add as many portfolio items as you want.

Elementor Themes Documentation

Dispay your portfolio items via WPBakery Page Builder:  If you click on the plus icon ( + ) to add a new element  on WPBakery Page Builder, you see a widget that we’ve created named Portfolio ( CPT ).  In this shortcode, make sure the Portfolio post type is selected. Inside the shortcode, you can see many options to adjust your portfolio items.

WordPress

On the other hand, if you want to display your portfolio items on a different page you want, here what you need to do is save the demo portfolio section as a template and then use it anywhere on your website. So, there are just three steps in order to display your portfolio items on a different page you want. You might watch this video to see how to save a section as template and use it anywhere you want on your website.

Default Page template customize options

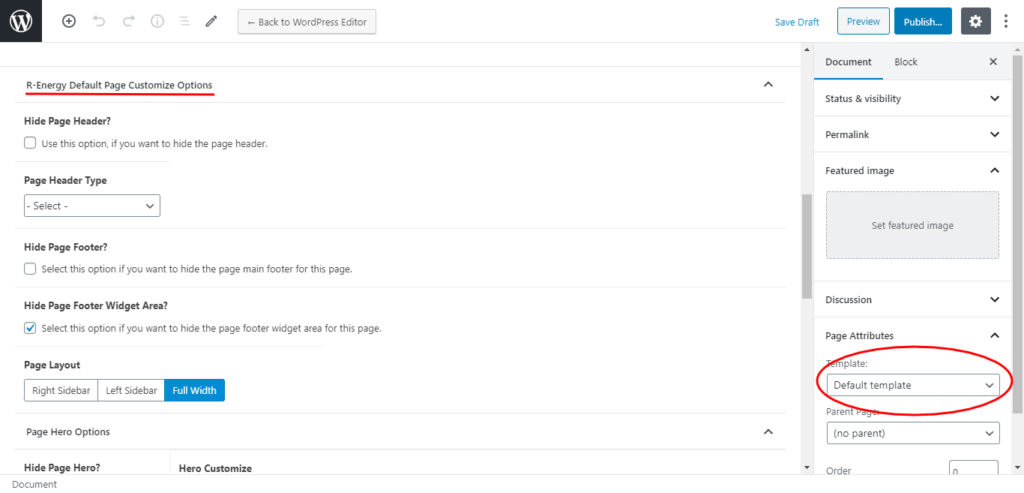
If you like to use this template type, you can see a lot of options, from header to footer, in the page metabox area  and you can those options at the bottom of your page in the backend editor.  You can select your page sidebar layout. It also offers you some options to disable the hero, footer, page breadcrumb and chnage the header types or can the title subtitle and their color as well. You may also have a look at the screenshot below:

WPBakery Page Builder

Custom Page Template

This page template is what you get when you install the demodata. If you like to use the way as it is, you might use this page template.

WPBakery Page Builder

How to Add a Favicon ?

You can add a favicon through your WordPress panel here: Appearance > Customize > Site Identity ( Select site icon )

Why demo data not imported properly ?

Before importing the demo data, you have to make sure that your server configuration is set to as we described here

How to change my website frontpage ?

Incase you have more than demo pages, you can easly select any of the demo pages as your frontpage through your WordPress panel. You can see the steps below:

  • From The dashboard, go to Settings > Reading ;
  •  Choose a Static page in the Front Page Display sections to set the front page to display a static page ;
  • Use the Front Page drop-menu to choose from existing pages;
  • Use the Post Page drop menu to choose the blog page for your website;
  • Hint the ” Save Changes ” button to save and publish your changes.

Why Meta Box plugin ask you for a licence key ?

The lisense key is asked ONLY for the pro version of Meta Box plugin, which is just optional. You do not have to get a lisense key for the pro version in our theme. 

Why the WPML plugin doesn't come with your theme? You said you have a WPML-support.

WPMLsupport means that this theme is fully compatible with the plugin, but you need to buy the plugin license separatly to be able to use it.

How to Fix ” The theme is missing the style.css stylesheet” issue in WordPress ?

A common issue that can occur when installing a WordPress themes is “The package could not be installed. The theme is missing the style. css stylesheet.” error message being displayed when uploading or activating the theme. One of the reasons you may receive this error is if you have uploaded the incorrect file. Please read this article, in which we’ve covered this issue in details.

Why a WordPress theme is slow and how to speed up ?

If you are not happy with your website speed,  there might be many reasons behind it.  We’ve covered this topic in this detailed article. We hope hese tips might be helpful in making your website faster.

Why is Security important in WordPress themes ?

No matter you’re using a WordPess based theme or another, everly website is potentially vulnerable to attacks. So, in this article, We’ve explained this issue in details. you may want to check it if you like to be knowledgeable about this topic.

How to build a onepage menu ?

One – Page menu is having a smooth scrolling between sections on the same page. You can be able to build a scrolling menu reading this article.