Trying to fix sidebar under content error in WordPress? This issue occurs with WordPress templates that use a two-column layout and a sidebar for the content. Due to a minor change in the code, the sidebar starts appearing below the content rather than next to it.
While there are several possible causes, there are primarily problems with Hypertext Markup Language (HTML) or Cascading Style Sheets (CSS). Fortunately, problems are relatively easy to fix, so you can quickly optimize your site.
In this article, we will show you how to easily fix sidebar below content error in WordPress.
Note: You can see the tutorial video at the end of the article.
Common Reasons for Sidebar to Drop Below Content in WordPress?
Sidebars in WordPress are content areas that are meant to be displayed to the left or right of the main part of the page (or sometimes both). They often contain widgets, registration forms, links to related posts, or similar content that you would like to include on your site.
Due to various bugs or errors, your sidebars can sometimes appear at the bottom of the page rather than on the left or right. Needless to say, this can easily ruin a well-designed website.
The primary reason for this behavior is problems with HTML or CSS on your site. It’s usually the result of direct changes you’ve made to your site’s code, such as a theme or plugin file.
For example, the page may have an extra or undisclosed <div> tag. The problem can even be attributed to incorrect width and float settings in your CSS. Fortunately, fixing this error is easy enough.
How To Fix WordPress Sidebar Under Content Error
Now that you know the potential causes of this confusing error, it’s time to fix it. We recommend that you follow the three steps below in order and move on to the next step only if the previous step does not work. Before you start, don’t forget to back up your site, just in case.
Step 1: Undo Your Recent Changes
When your sidebar moves after adding a plugin, custom code or something to your website, you just need to undo the change. By reversing your action you will revert to the original layout and isolate the problem.
If you go back and undo the change, you’ll see the sidebar in its proper location. If this is the case, you can look for potential issues with the changes you’ve made. For example, if you installed a new add-on, look for alternative options.
If you’ve changed or added to your site’s code, look for typos or syntax errors.
Step 2: Disable WordPress plugins
The look and style of your WordPress site is controlled by the theme you use. However, sometimes WordPress plugins can also add their own HTML and CSS to your website.
For example, adding a contact form to a page or a lightbox popup loads additional CSS and HTML.
You can temporarily disable all WordPress plugins on your website to ensure that the problem is not caused by a WordPress plugin.
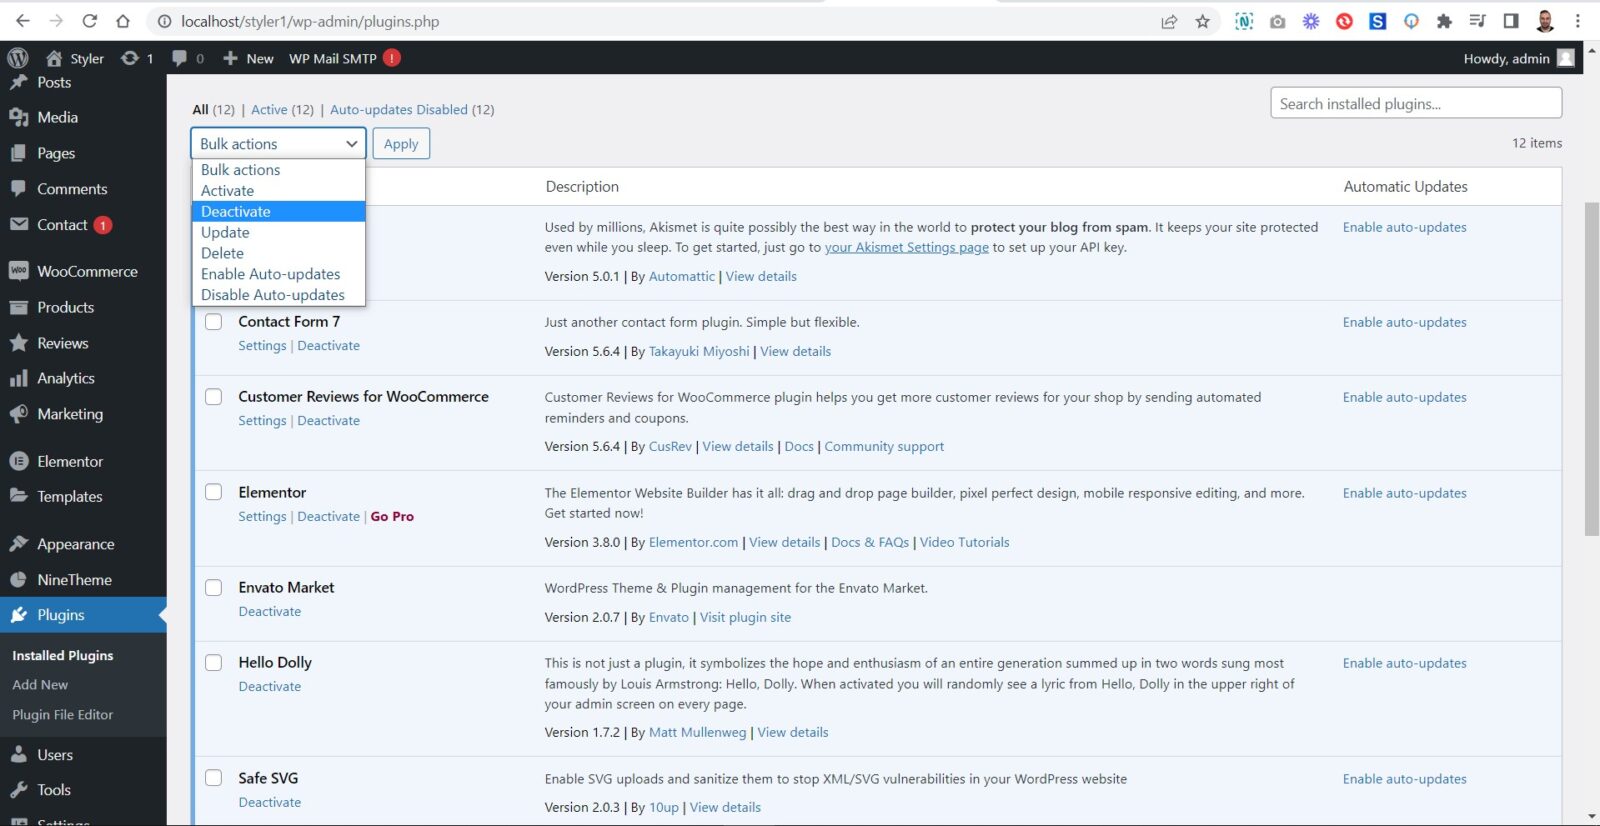
If the problem goes away, it means a plugin is causing the problem. Activate all your WordPress plugins one by one, checking your website after each plugin to find out which one is causing the problem.
After that, you can reach out to the plugin’s support to find a solution and report the issue.
Step 3: Fix Unclosed or Extra Closed Div Tags
In most cases, the WordPress sidebar is the result of an unclosed or extra <div> tag.
Your website is divided into sections with these HTML tags. Placing them incorrectly can cause the site to render incorrectly (hence the floating sidebar).
<div class="container">

  <div class="footer"></div>

  <div class="Header"></div>

  <div class="Content"></div>

  <div class="Sidebar"></div>

</div>
In this example, the <div> tag is properly closed.
<div class="container">

  <div class="footer"></div>

  <div class="Header"></div>

  <div class="Content"></div>

  <div class="Sidebar"><div>

</div>
In this example, there is no slash before the closing <div> tag. As a result, the browser does not understand that the element must be closed, and the content that should have been outside is now inside.
To fix this, look for any missing or extra tags in any template file you’ve changed. The error is usually found in your theme’s “template parts” files. To access it, go to Appearance > Theme Editor in your WordPress dashboard.
Select the correct theme from the dropdown at the top of the page and then navigate to the template parts section in the sidebar.
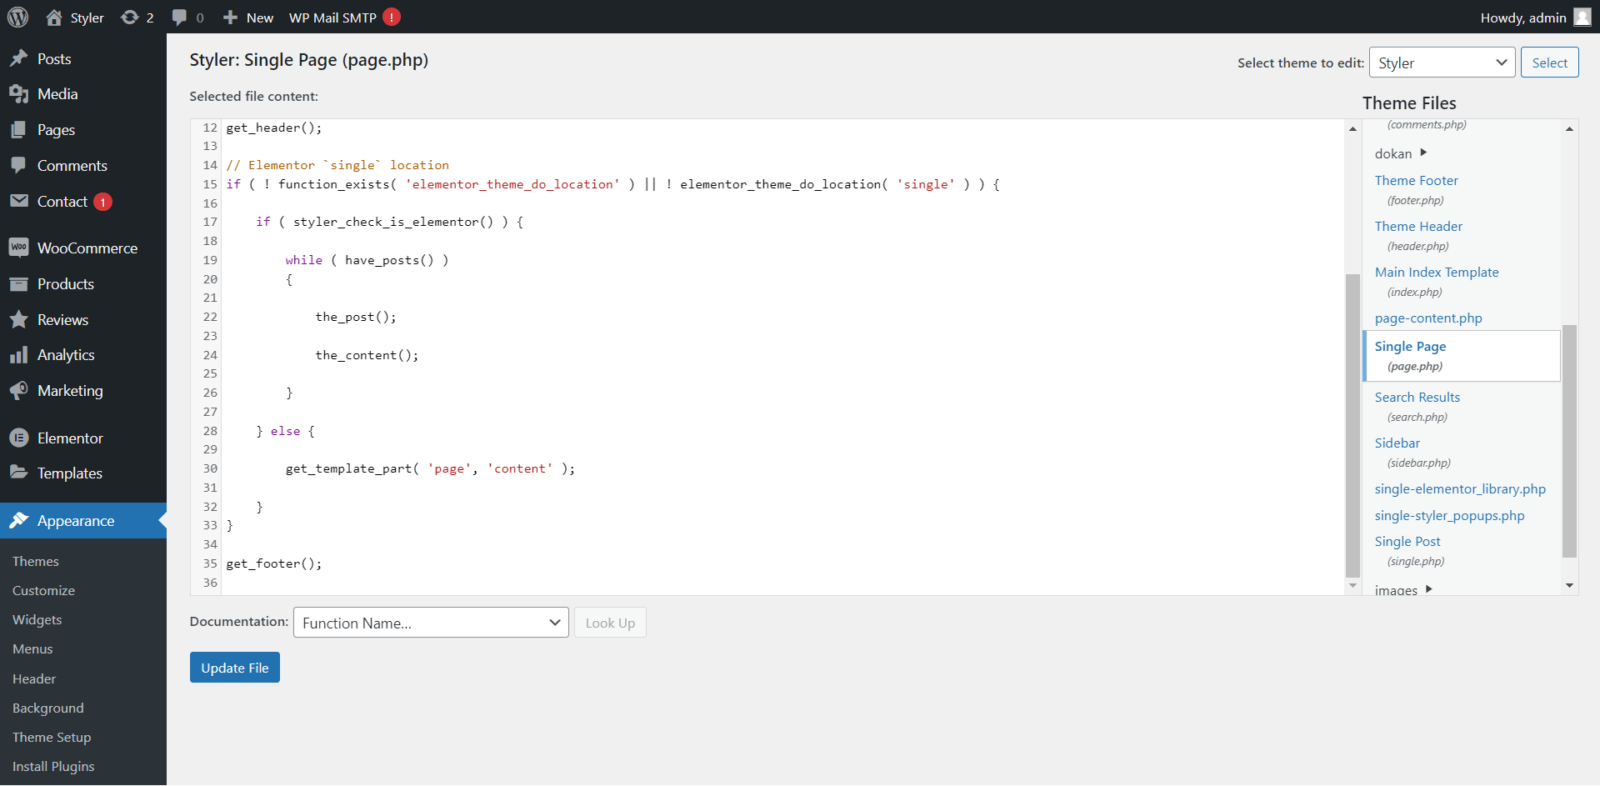
Pages and posts are usually created by templates under the content section. Find what you need from the list, check and make any necessary corrections.
When you’re done editing the file, click Save to save it.
Step 4: Troubleshoot CSS Issues
CSS can also play an important role in causing this error.
Custom CSS can be added to your WordPress site using the Additional CSS section of the theme editor.
You may have messed up the formatting by using this feature or by editing the CSS in some other way. The “width” attribute is often mistaken for animated sidebars.
Make sure that the sum of the widths of the Content and Sidebar elements does not exceed the width of the Wrap element. When this happens, the smaller element will be pushed down.
Step 5: Clear the WordPress cache
If you still see the sidebar below the content area, you may want to clear your WordPress cache.
When you make changes that aren’t immediately visible, it’s usually due to caching issues.
It’s common for caching plugins to show you an old version of the same page. Clearing the WordPress cache and browser cache will help you see the changes applied to your website.
We hope this article helped you fix the Sidebar Below Content Error. You may also want to see our list of the most common WordPress errors and how to fix them.
If you liked this article, please subscribe to our YouTube Channel for WordPress video tutorials. You can also find us on Dribbble and Behance.

If you have any questions about this article or other topics, please click the button below. Your questions will be answered soon.
If you want an affordable, reliable and fast WordPress server, just go ahead and click on the button and get a package as needed.
Related Posts

7 Digital Marketing Trends to Follow in 2023
Apr 1, 2023


Envato elements

Canva

Envato Market

Envato Placeit
Blog Categories
- Agriculture 1
- Design 3
- eCommerce 13
- Energy 1
- Extras 75
- Free 4
- Grocery Store 3
- Software 1
- Technology 2
- Themes 78
- WordPress 145
- Plugins 58
- Cache 5
- Security 8
- SEO 10
- Spam 5
- User Managament 10
- WooCommerce 6
- Plugins 58
- WordPress Speed 2
- WordPress Tutorials 55